Hi! Welcome to another tutorial. Today I’d like to discuss how to deploy create react app to a live server.
I think there can be some confusion when you deploy because of misunderstanding how servers/react works.
Traditionally, websites work like so:
- Client sends HTTP request to your server to GET “/home”
- Server uses it’s routing logic to figure out how to respond. Alex set it up so that it sends clients “home.html”.
- Client clicks “login” link
- This triggers an HTTP request to GET “/login”
- Server responds with “login.html” using its routing logic.
- And so on and so forth.
Then, lot’s of smart people realized they could use JavaScript to render pages instead of sending another HTTP request. Eventually, this became JavaScript libraries like ReactJS, ViewJS, and AngularJS.
This adds a layer of complexity because now JavaScript is handling routing instead of the server. Let’s explore how a website would work with a React or JavaScript routing system. There are different ways to get this done, but this is typically what you’ll see in the wild, next to those gazelles:
- Client sends HTTP request to your server to GET “/home”
- Server uses it’s routing logic to figure out how to respond. Alex set it up so that the server sends “index.html” (which uses our JavaScript router) to ALL routes.
- Client gets a blank screen (Sometimes this is a loading screen. “index.html” is loading our JavaScript.)
- JavaScript Loads. Our JavaScript renders “home.html”.
- Note that our JavaScript knows how to load every page dynamically. When JavaScript renders home.html, it is really removing/adding elements into what we defined “home.html” to look like.
- Client clicks “login” link
- If we setup our JavaScript correctly, it captures this event. “Gotta catch them all,” after all. Instead of our link triggering an HTTP GET request, JavaScript steps in and handles rendering “login.html”.
- “login.html” is rendered by our JavaScript.
- If “login.html” requires more data from the server, this is where JavaScript fetches from our API.
- Done!
Note that Alex sets up the server to send index.html for ALL routes. This will allow the JavaScript to handle most of our routing. There are other more advanced setups, but we’re keeping it simple here!
Also, a key takeaway is this: Server routing is DIFFERENT than JavaScript routing!
Make sense? Here are a few examples of when a page is requested vs rendered:
If you…
- Use the url in the browser
- Use window.location.href
- Use an anchor element
Usually, you are sending an HTTP GET request to the server.
If you…
- Use JavaScript to handle your Links
- Use Link in React
You should be using JavaScript to render a page rather than request a page. For example, let’s say you want to GET some users from “/api/users”. If you used an anchor, you’d probably get a blank page with some JSON data. If you used Link in React, you’d probably get a pretty 404 Page not Found page.
Below is a quick diagram I created for visualization:
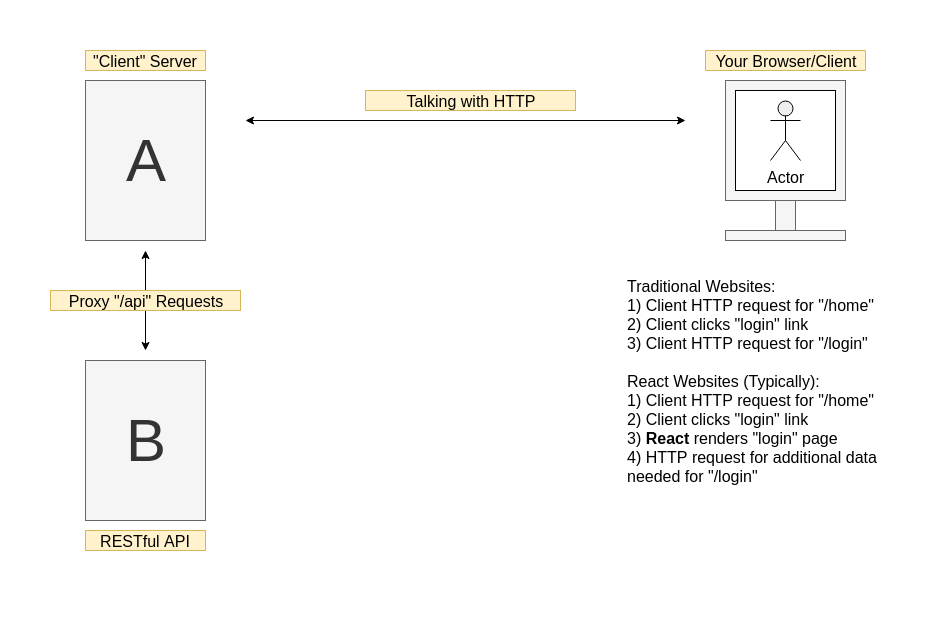
There are other types of setups you can use. For example, often I will combine “client” server A with “api” server B for small projects. This is just for a quick reference on how you could setup your server.
You may have a similar setup in your development enviornment. There are several reasons that “client” server A proxies /api requests to “api” server B.
- Separating the API and “client” helps us lower initial page load time. (Since the “client” server is not also serving the api)
- We proxy /api requests from “client” to “api” to avoid CORS (Cross-Origin-Resource-Sharing) issues. Browsers block requests to content outside of the origin. For example, if you have a website called mysite.com, your browser will most likely refuse attempts to request content from unsafe.com, because it is expected that content comes from the same origin.
If you are having issues with CORS, there are typically 2 ways to solve them:
- Make your “origin” server proxy /api and other endpoint requests.
- Make your “origin” server white list all endpoints the client needs to access.
These are the only ways I know of to fix CORS issues on your website. Notice that CORS issues are resolved on the origin server? This is for security reasons!
Now, let’s dive into some code! I’ll show you some code snippets of a website I’ve deployed to Heroku. Click here to view it live. It uses a MERN stack (MongoDB, Express, React, Node). I use Create React App on the front-end.
// package.json
{
    // Other packages/config go here
    proxy: 'localhost:5000'
}
As per the Create React App Docs, we use the proxy field to let Create React App know that our api is open on port 5000. This allows us to have a setup similar to our diagram where server A is Create React App and server B is our API. All requests to /api in our create-react-app are proxied to port 5000.
Important note: This works ONLY for development!
In order to make our Create React App work in production, we need to realize create-react-app does NOT handle production. You must setup your own “client” server for production.
You can use the serve npm package, setup your own server with Express, etc. to get your website working in production. See the Docs for more deployment options.
If you have an express server for production it might look something like this:
let express = require('express');
let app = express();
let apiProxy = require('./utils/myproxy.js');

// Other Config goes here...

// Serves static files in /public
// $ npm run build
// Will build your files to /public
app.use(express.static('public'));

// Proxy /api requests to API server
// You could also white list the api server & call it directly from the client.
// Remember, the whole point of this line is to avoid CORS issues.
app.use('/api/*', apiProxy);

// Sends the React App to ANY other route.
// This server does NOT handle the majority of routing. React does this.
app.get('/*', (req, res) => {
    res.sendFile('path-to-index.html');
  }
}

// Listen on set port OR 80
app.listen(process.env.PORT || 80);
Now you have a file that will run your app in production! Congrats!
I hope that this post helped you understand how production worked and cleared up some confusion. I created this more in-depth tutorial because a viewer requested it. If you’d like to request more content like this, please let me know.
Thanks for reading!